Showing posts with label cake. Show all posts

Friday, January 1, 2016

Ringing in the new year....

Happy new year, dear readers!


This new year, I start by bringing to you this very special Christmas fruit cake recipe. I cannot boast of a favourite family Christmas cake recipe which has been passed on from previous generations. So, I thought, I get to choose/discover one of my own!

I love the Christmas fruit cake, or plum cake as it is called in southern India. I have been trying different recipes over past couple of years. And this time around I can proudly say that I nailed it. Well, I found what I was looking for. A fruit-rich, moist, dark and flavourful christmas cake. It is easy and quick too.

I watched couple of videos and read couple of recipes before finalising the recipe. The main inspiration for the recipe is the Easy Fruit Cake by Stephanie of Joy of Baking. This cake is also called 'Boiled fruit cake' because the fruits are cooked in a mixture of sugar, water and spices. It aids the fruits to soak in all the flavours. This is a good news for those who did not soak their fruits in advance, this recipe doesn't call for it!


The recipe does not contain too many spices. Just three of them, which can be easily found in any Indian kitchen. For dry fruits, I used a combination of raisins, cranberries, prunes, apricots. Prunes add a lot of moistness to the final cake. You can also add chopped nuts like almonds, cashews, pistachios. The last time I used walnuts, they tasted bitter in the final cake. So I skipped it this time. The amount of fruits is slightly less that the original recipe. For candied fruit, I used candied papaya (tutti-fruiti) and candied karvanda/karonda. I didn't have candied orange peel at hand so I used orange zest instead.

I added a small amount of cocoa powder to boost the dark color I was aiming for. But I think the major ingredient which lends to the color is dark brown sugar. I replaced some of the water with rum. You can also use other alcohol like brandy, grand mariner etc. Or you can skip it completely like the original recipe. And for those who do not use egg, I think ground flaxseed can be used to replace it.


Also, no special equipment is called for. Just few pots and a large spoon to stir. So, a lots of plus points. What are you waiting for? Bring out your dry fruits and spices and get going! Here is the recipe.

Christmas fruit cake

Ingredients:

2/3 cup (140 gm) demerara sugar or dark brown sugar, firmly packed
1/3 cup (70gm) white granulated sugar
1/6 cup (40ml) rum
5/6 cup (200ml) water
1/4 cup (57 grams) butter
1/2 tsp ground cinnamon
1/2 tsp ground cloves
1/4 tsp ground ginger
2 pinches of salt
1 Tbsp cocoa powder
250 grams mixed dry fruits like raisins, cranberries, figs, prunes, apricot
Zest of one orange / kinnow / malta orange

2 large eggs, lightly beaten
1 1/2 cups (195 grams) all-purpose flour
1 tsp baking soda
1 tsp vanilla extract
slightly less than 1 cup (125 grams) candied raw papaya (tutti-frutti for those in India) and karvanda/karonda

Steps:

Preheat oven to 180°C. Grease, line and dust the baking pan(s). Makes a large loaf and a mini loaf or one 9" round cake. Set aside.

Whisk together the flour and baking soda, set aside.


In a large saucepan or a heavy bottomed pot, put the sugar, rum, water, butter, spices and dry fruits. Mixed candied fruit will be added later. Over medium heat, bring this mixture to boil. Stir occasionally. Let simmer for 5-8 minutes, then remove from heat and let cool till lukewarm.


Add slightly beaten eggs to this mixture and mix well.

Add vanilla and flour mixture and mix. Stir in the candied fruits/peel.

Pour the batter in prepared pan and level the top and place it in the oven for baking.

It will take 25-28 mins for a mini loaf, 35-40 mins for a regular 9"X5" loaf and 50-55 mins for a 9" round. Test using a toothpick around 5 mins prior to above mentioned baking time.

Once done, remove from the oven. Cool the cake in cake pan for 10 minutes. Turn it out onto a wire rack. Let cool completely.


Although this cake can be consumed immediately, I suggest to let it rest at least overnight for the flavours of mature. If storing for more than a week, wrap it in cling wrap and store in a cool and dry place.

Enjoy with a hot cup of coffee or a shot of rum!

Happy Baking!
Shwe


P.S. : Regarding the long absence of posts on this blog, well, "What are new year resolutions for?!" I say.
May you stick to your resolutions this new year.

Happy New Year, again!

Sunday, April 20, 2014

One-year blogiversary and some food thoughts...

This blog has turned one and we are celebrating our first blogiversary! I never thought I would use that word, not that I didn't intend the blog to turn an year old. There are still tons of recipes I want to try, hundreds of them I want to share with you. Here's a slice of the one I will be sharing in this post:


It's fun, the whole process of writing a post. Starting with baking and tasting a recipe, then taking pics and then finally wrapping it all up in a fun-photo-recipe package. 

The last I counted, there were seven recipes that I have posted. But I will take this opportunity to mention that I bake way more than what I post and my notebook is full with lots of scraps of papers, chocolate wrappings, paper cuttings stuffed inside it. All containing recipes I am yet to try, notes I am yet to share.

Over the last couple of years, I have learnt baking from books, people's experiences, food shows even. But my largest source is the Internet, more specifically the "blogoshpere". And you will find a varied variety of people in that space. Some are bonkers awesome! Some are total geeks! Some are passionate and elegant! Some are humble and helpful! Some are legends! (View the links and you will know) I can go on and on.

Also a couple of years back I came across this group on facebook called the Home Bakers Guild or HBG as they call it. It is a very active group comprising of professionals, bakers running business from home, hobby bakers and newbies. A bunch of enthusiastic, crazy and helpful people baking their hearts away. It is awesome and inspiring!


In this post, I present to you this flavourful and moist pineapple upside-down cake. I have baked this cake thrice, each time with a different recipe. I will be sharing the one I liked most.

It is called upside down because it is baked with the pineapple at the bottom and once done baked, it is turned upside down and we get to see it in its full glory. The brown sugar gets cooked into caramel, pineapple absorb its slightly burnt flavour and cinnamon adds a beautiful note to the overall taste.


Caramel, juicy-sweet-tangy pineapples and a super moist cake which absorbs the flavours of caramel and pineapples. It cannot get any better!
Here's the recipe:

Pineapple Upside-Down Cake


Ingredients:


Topping
1/4 cup butter, melted
3/4 cup packed brown sugar
8 slices of pineapple, cored

Cake
1 1/2 Cups All-purpose flour
1 1/2 tsps baking powder
1/4 tsp salt
1/2 tsp cinnamon powder
2/3 cup sugar
1/2 cup butter
2 eggs
1 tsp vanilla
3/4 cup milk

Steps:

Preheat the oven at 175°C . Grease a 8" or 9" round pan heavily. 

Pour the melted butter in the pan. Spread the brown sugar evenly on top the the butter.
Cut pineapple in thick slices. Remove the core. If using canned pineapples, drain the juice and pat the slices dry using paper towels.
Place the pineapple slices on top of the sugar. Pack them as close as possible because they shrink while baking.

Sift together all of the dry ingredients except the sugar. Set aside.

In a large bowl cream together butter and sugar, for 3-4 minutes, till light and fluffy. Add eggs one by one, beat well after each addition. 

Add vanilla and pineapple essence, if using. Mix.

Add milk and dry ingredients alternately in three batches, starting and ending with flour. Mix just till combined.


Spread batter on top of the pineapples. Tap the pan on the counter once to release any trapped air pockets.
Place the pan on a baking tray or cookie sheet. Bake for 45-50 mins or till a toothpick or knife inserted in cake comes out clean. Be careful not to dip the toothpick too deep else you will hit the caramel.


Once done, take the cake out of oven and let it cool in pan for 10 mins.
Turn it out onto a plate. Serve warm.

It there are any pineapple pieces sticking to the bottom of the pan, just lift them and place back on the cake.

This cake was worth every anxious moment spent while unmoulding and flipping the cake upside-down. I hope you will give it a shot!

Happy Baking!
Shwe

Thursday, April 10, 2014

Last but not least, a spiffed up Birthday Cake


Picking up things from where I left last, we were celebrating the 'birthday season' during November. The season ended with Hubby's and Master Ts' falling just days apart. And birthdays mean cake. Not one but two!


Master T turned two in November! He celebrated his birthday with friends at playschool. For the celebrations there, I baked vanilla chocolate marble cakes, yes plural. It was fun to see li'l ones asking for a second serving.

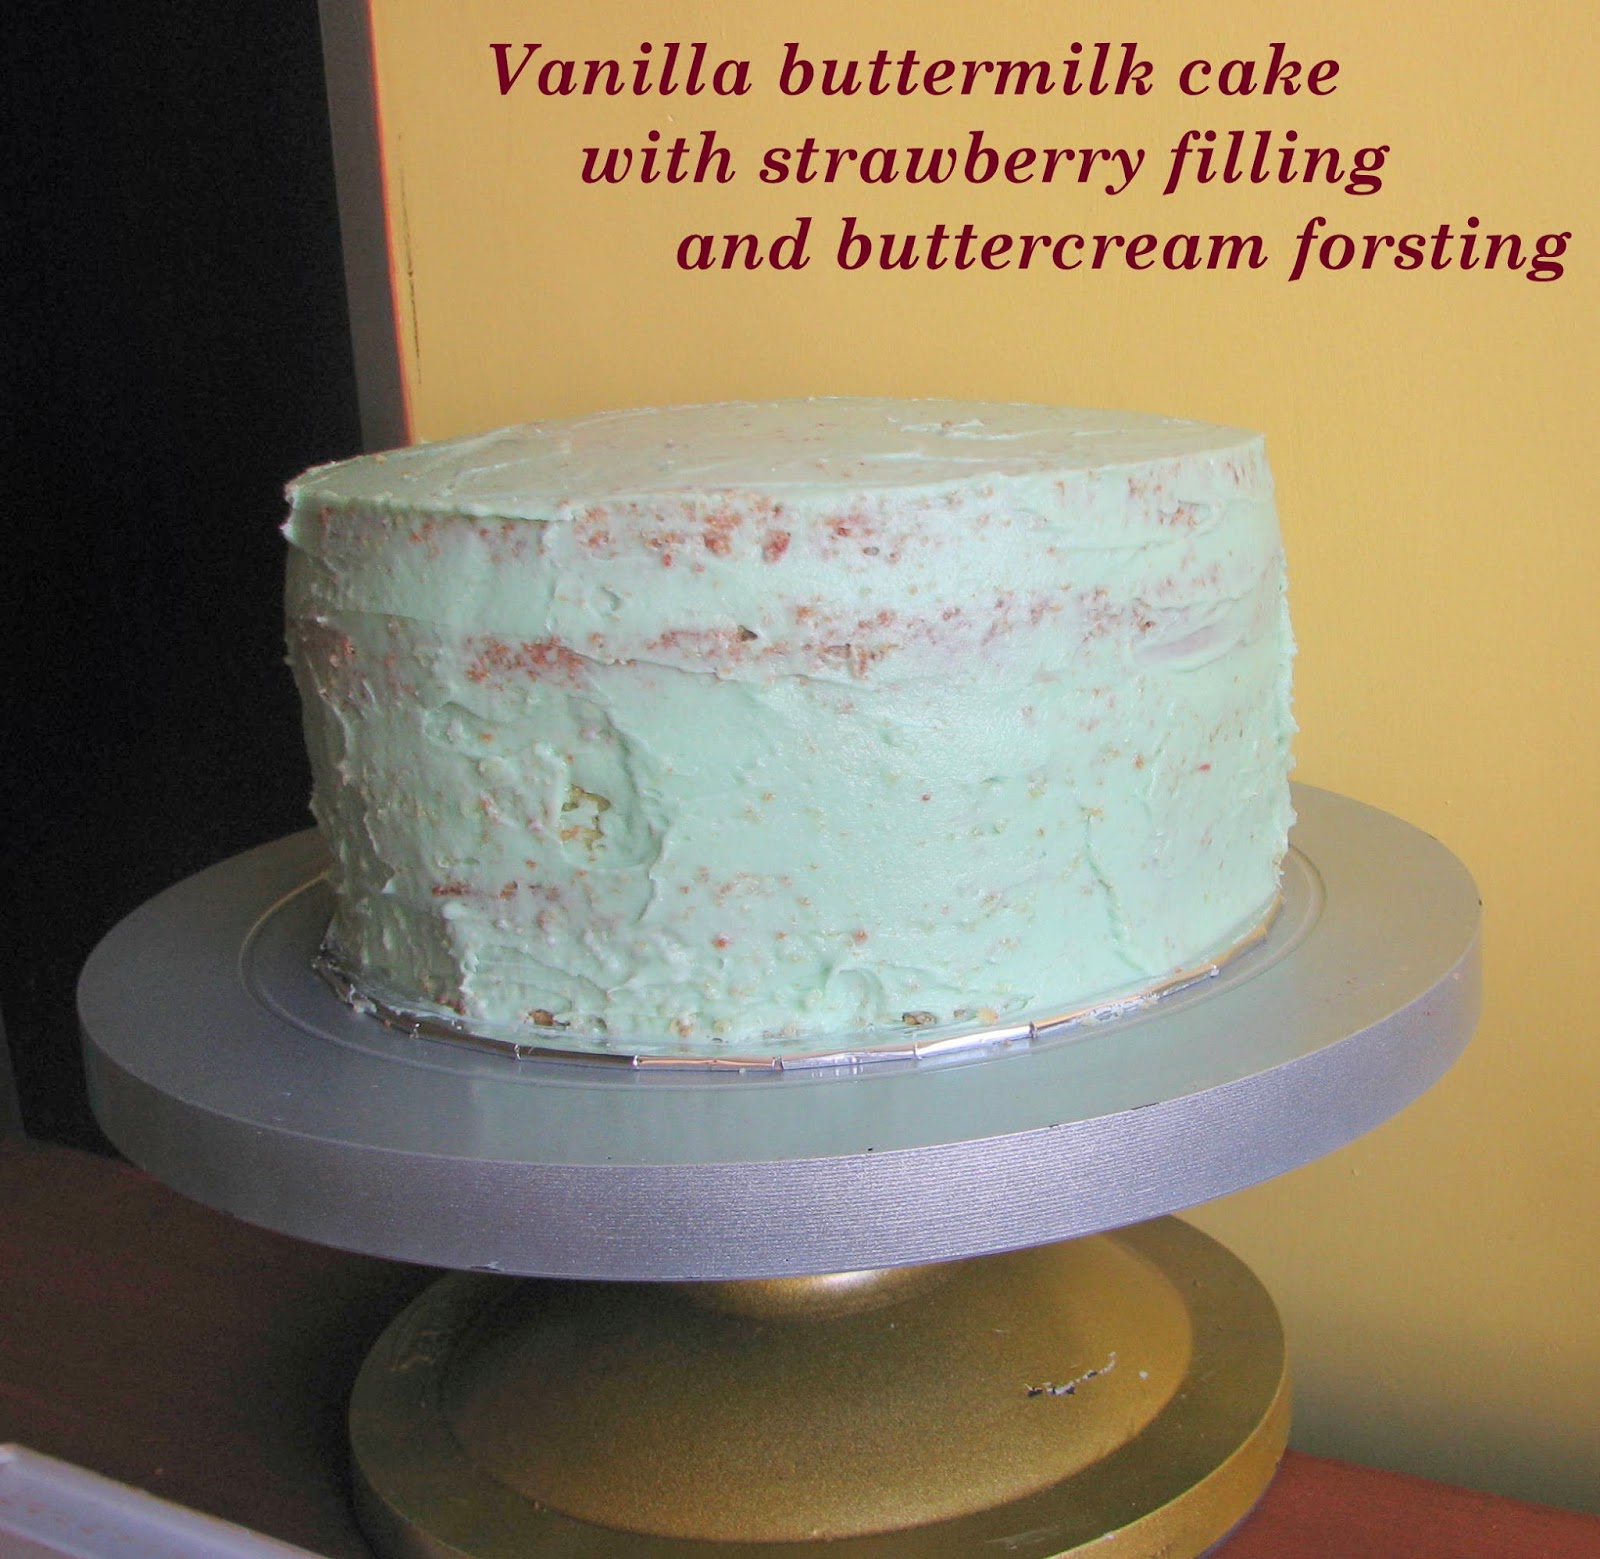
For the party at home I wanted a different flavor for the cake, no more chocolate! Also look wise a spiffed up one. Then there was this vanilla buttermilk cake recipe I wished to share with you. And some strawberry crush with whole strawberries I had been waiting to use. Also T's maushi had gifted me some candy cake decorations from Wilton. I put all these ideas together and that lead to this awesome cake.

It was fun to watch people's reaction on seeing the cake. 'Wow!', 'It's great!' , 'It's a tall cake!' . And tall it was and it awed you. But only till you lifted it. I was deceptively heavy! And it vanished from the plates in a jiffy. 


The cake has four layers of vanilla buttermilk cake. The recipe is inspired from Deb's blog here. This cake is a keeper, light and moist. I have baked it a couple of times and I was pleased with the result each time. I was waiting for an opportunity to use it in a layered cake and this one seemed perfect. The only major change from the original recipe was amount of baking soda used.

Two tips to get this cake perfect: one, cream the butter-sugar mixture for good 3-4 minutes. And second, refrain from stirring too much while mixing flour and buttermilk. Take the sentence 'Mix just till combined.' literally. You have to mix the batter just till you stop seeing dry flour in it. Any more mixing you do helps in creating gluten which leads to a hard chewy cake. Trust me that is not something you want.


For filling the cake I used strawberry puree and strawberry buttercream. For frosting the cake I followed a simple buttercream recipe. I think I will go for Swiss meringue buttercream next time. I tinted the outer frosting slightly with blue gel color. Use a toothpick to pick the color from the bottle. The amount of color will seem teeny-weeny, but that's as much as you want. A bit goes a long way. The butter I used was yellow in color and hence the buttercream turned sea-green instead of blue. 

As much as I love baking cakes and experimenting with new recipes and ingredients, my skills in terms of frosting and decorating them are very limited. It takes loads of practice they say. And loads of buttercream too, I add. This cake was frosted in three steps, layering+filing, crumb coating and final frosting. For the final touch I decorated using ready-to-use edible cake decorations by Wilton.


I was happily surprised looking at my creation. The delicious cake was worth the hours spent on planning, baking, frosting and keeping master T from licking the frosting.
Here is the recipe:

Vanilla Buttermilk Cake with Strawberry filling and Vanilla buttercream 


Ingredients:

Cake
4 Cups + 2 Tbsps Cake flour*
2 Cups sugar, powdered
2 tsp baking powder
1 tsp baking soda
1/4 tsp salt
4 eggs
1 Cup butter
2 Cup buttermilk**
1 1/2 tsp vanilla extract
1/2 tsp strawberry essence

Buttercream
1 Cup (227grams) butter
4 Cups (460) icing sugar
1 Tbsp vanilla extract
2 Tbsps cream or milk
4 Tbsps strawberry puree

Strawberry Puree
1 cup store bought strawberry puree
or pulse strawberry crush in a blender

Steps for preparing cake:
Preheat oven to 175°C. Grease, line and dust two 8-inch round baking pans. Set aside.

Sift together all of the dry ingredients except the sugar.  Set aside.

In a large bowl cream together butter and sugar, for 3-4 minutes, till light and fluffy. Add vanilla and strawberry essence, mix well.

Add eggs one by one, beat well after each addition.

Add buttermilk and mix. The mixture may curdle but it will all come together once flour is added.

Add flour mixture in 3 batches. After each addition, mix just till combined.

Spread batter in prepared pans. Tap the pans on the counter once to release any trapped air pockets.
Bake for 30-35 mins or till a toothpick or knife inserted in cake comes out clean.


Once done, take the cake out of oven and let it cool in pan for 10 - 15 mins.
Turn it out onto a wire rack. Let cool completely.
Before frosting or decorating this cake, refrigerate it for at least an hour.


*Cake flour is similar to All-purpose flour but it is lighter in weight and has lower protein content. This results in more soft and tender cakes.
Substitute 1 cup of cake flour with 3/4 cup of All-purpose flour and 1/4 cup cornflour/cornstarch.
For this cake, I used 3 cups All-purpose flour + 1/2 cup of cornflour instead of the given amount of cake flour.

**Buttermilk is the liquid left behind after churning butter out of cream.
For substituting 1 cup buttermilk, take about 2 tablespoon plain curd in an 1 cup measuring cup and fill the rest with milk. Let it set for 15-20 minutes and then use it in place of buttermilk in above recipe.

Steps for preparing buttercream:
Frosting:
Cream butter till fluffy. Add sugar in 1/2 cup batches and mix well.
Add vanilla, mix well. Add cream, starting with 1 tablespoon to get desired consistency.
You can make half a batch of this and make more if required.

Filling:
For strawberry flavoured buttercream, add strawberry puree along with vanilla while mixing.

Assembly:
For assembling this cake, I highly recommend using a turn table. But we can also use a tall dabba/round tin to raise the cake to comfortable height.

Have your serving plate or cake board ready.

Cut each cake horizontally in two layers using a long serrated knife or a bread knife.

Put a small amount, about 1/2 teaspoon of buttercream in the center of the cake board or serving plate. This stops the bottom layer from sliding around while we frost the cake.

Place the bottom layer of one of the cakes on the serving plate/cake board.
Spread about 3-4 tablespoons of strawberry puree on this layer.
Place the top layer of the same cake on the puree. Dollop about a third of the strawberry frosting on top. Spread the frosting leaving about one-fourth of an inch margin around the edge. The margin is to avoid frosting from oozing out when the next layer of cake is placed on top.

Place the second top layer of a cake on top of the frosting. Spread some strawberry puree on top of this. Place the last remaining bottom layer of a cake with the bottom side facing up. This is to get a smooth top.

Taking small amounts of buttercream, spread it around the sides and top of cake. This is called crumb coating, to seal-in the crumbs. 
Refrigerate the cake for 30 mins for the frosting to set.

Now frost the sides in back and forth strokes using small amount of frosting at a time. Dollop the remaining icing on the top of the cake and spread it evenly. 

Using my small offset spatula, I drew vertical strokes on the sides while turning the turn-table constantly. On the top of the cake I made kind of spikes, again using the offset spatula.

I hope you will give the recipe a try or at least some parts of it or a scaled down version of it.

Happy Baking!
Shwe

Tuesday, January 7, 2014

Celebrations Galore
and the Best Chocolate Birthday Cake

November is a month of birthdays and celebrations for us. I call it 'the birthday season'. Well, the season actually begins just few days short of the month with my young cousin's birthday. But it so happened that it was celebrated in the month of November. When asked about the choice of flavor, pat came her response 'Chocolate!'.


A cake meant for Birthday needs to be more special and prettier. Since I would rather bake than decorate, I went for simple technique. It was more like spur of the moment or shall I say spin of the moment. The turntable mom gifted me some time back was really handy.

The cake is moist and chocolatey with a hint of coffee. I think it is very similar to a devils' food cake. What I also love about this cake is that it doesn't need a slather of sugar syrup to keep it moist. The inspiration for cake is from here. I omitted the black cocoa. Definitely use it if it is available. Also I used instant pure coffee powder, instead of brewed coffee. If not a coffee fan, you can simply skip the coffee powder and use plain water instead.

Making the cake itself was a breeze. The batter is prepared using the muffin method, a time and effort saver. And the result is a fluffy, moist and chocolatey cake. You measure and mix the dry ingredients in a large bowl. Measure the wet ingredients in a different bowl, give them a stir. Pour the wet mixture in the dry one, in 2-3 batches and stir just till combined. And the batter is ready to be baked. Just a word of caution here, do not over-mix because that will result in a rubbery textured cake. Also, line the pan bottom with butter-paper to avoid cake-stuck-to-the-bottom scenario.

The cake base can be prepared days ahead. In fact, I suggest making the cake one day prior to frosting/decorating it. It stores well too, just let the baked cake cool to room temperature and wrap it well in cling-wrap and store it in refrigerator. It can also be frozen. Just bring it to almost room temperature before you frost it.


I used a simple chocolate buttercream as the filling. And for frosting the top and sides, I mixed in some whipped cream to the buttercream. Addition of whipped cream made the frosting silkier, though it lightened the color of the frosting a bit.

Simple buttercream tends to be gritty because of the sugar granules not getting dissolved completely. I think if prepared days ahead, the grittiness is gone. Or maybe it was addition of whipped cream that did the trick.


I would refrain from calling this cake the best chocolate cake but for a 'birthday celebration cake', it definitely is a winner. This one won hearts of all; from a two year old to a sixty two year old. 
Hope you will bake it! Here is the recipe:

The Best Chocolate Birthday Cake


Ingredients:

Cake

1 cup (200 grams) sugar, powdered
3/4 cup + 2 tablespoons (123 grams) All-purpose flour
1/4 cup + 2 tablespoons (~ 45 grams) cocoa powder
1 teaspoon baking soda
1/2 teaspoon baking powder
1 pinch of salt
1 egg
1/2 cup buttermilk
1/2 cup strong black coffee (1/2 cup hot water plus 2 tsp of instant pure coffee powder)
1/4 cup vegetable oil
1 teaspoon pure vanilla extract

Buttercream

1/2 cup (1 stick, 114 grams ) butter, softened
1 3/4 cups (200 grams) confectioners / icing sugar
1/4 (24 grams) cup cocoa powder
1 pinch of salt
1 teaspoons vanilla extract
2 tablespoons cream/milk

Steps for preparing cake:

Preheat oven to 175°C. Grease, line and dust one 8-inch round baking pan. Set aside.

Measure the dry ingredients in a large bowl. Using a whisk, mix till the ingredients are thoroughly combined.
In a separate bowl, mix together egg, buttermilk, coffee, oil and vanilla.
Add wet mixture to dry one in 2-3 batches. Mix till just combined. The batter will be thin. 

Pour batter into prepared pan. 
Bake in preheated oven for 30 to 35 minutes for round pans. At 30 minutes mark, insert a wooden toothpick in center to check if it is done. Cool the cake in cake pan for 10 minutes. Turn it out onto a wire rack. Let cool completely.

Buttermilk substitute: for 1/2 cup buttermilk, take about 1 tablespoon plain curd in an 1/2 cup measuring cup and fill the rest with milk. Let it set for 15-20 minutes and then use it in place of buttermilk in above recipe.


Steps for preparing buttercream:

Sift together 3 cups powdered sugar into a bowl. Sift cocoa powder in a different one and set aside.
Cream butter for a few minutes till fluffy, with a handheld mixer. Turn off the mixer.

Add about a third of sugar to the butter. Starting on low speed, mix till the sugar is absorbed. Increase the mixer speed and beat for 2 more minutes. Repeat with remaining sugar.

Turn off the mixer. Scrape the bowl, add sifted cocoa and mix till cocoa is absorbed.
Add vanilla extract and salt and cream and mix some more, about 3 minutes.

You should get an even-colored, smooth buttercream. For stiffer consistency, add a little more sugar. for a thinner one, add additional cream/milk 1 tablespoon at a time.


Assembly:

Cut the cake in two layers using a long serrated knife or a bread knife. Place one layer on a serving plate/cake board.

Dollop about a third of the frosting on the bottom layer. Spread the frosting leaving about one-fourth of an inch margin around the edge. The margin is to avoid frosting from oozing out when the next layer of cake is placed on top.

Place the second layer of cake on top of the frosting. Now frost the sides in back and forth strokes using small amount of frosting at a time. 

Dollop the remaining icing on the top of the cake and spread it evenly. 

You can create different patterns on the sides and top. You can add some sprinkles on top too. Or some chocolate chips the way shown in the picture.


Happy Baking!
Shwe

Thursday, July 11, 2013

Talking about 'good' fat

Come summer the market is loaded with summer seasonal fruits. Avocado is one such fruit, commonly known as butter-fruit in southern India owing to it's creamy-buttery-soft pulp. It is a pear shaped dark green fruit with parrot green pulp and a large seed. It has almost no taste, almost. Mash it a little and you might notice a subtle flavour.


So 'What's with the good fat?' you may ask. Fats and good-fats are a common running topic of discussion in our household. Arguments range from 'no fat is good' to 'some fats are good' to 'little amounts are essential'.
Apart from being loaded with potassium vitamin K and folic acid, avocado contains large amounts of good fat. So why not use it to substitute butter in a cake?!


I recalled coming across a vegan Chocolate Avocado Cake. Joy, the author of the blog, mentions it to be a moist and chocolatey cake. Bang on target on both accounts.
You wouldn't miss the egg or the butter. And definitely won't be able to make out presence of a fruit. You might smell the oil though. It was fun to see the expressions on faces when the ingredients of the cake were disclosed.


The original recipe includes a avocado based frosting. For me it had to be Ganache. Just two ingredients, chocolate and cream, some stirring and you get one of the simplest and quickest of frostings/fillings. You'll love to make and eat it if you are a chocolate lover. Check here for more info on how to make it.


I made sourcream ganache with coffee flavour. I added some icing sugar to reduce the tang lent by sourcream. I used it as a filling and for frosting the top of cake. I left the sides bare.


What was intended to be an experiment turned out to be a great party cake! Here's the recipe:

Eggless Chocolate Avocado Cake with Sourcream Ganache


Ingredients:


Cake

1 1/2 Cups All-purpose flour
3-4 Tbsps cocoa powder
2 pinches of salt
1 tsp baking powder
1 tsp baking soda
1 Cups granulated sugar
2 Tbsps vegetable oil (I used olive oil)
1/4 Cup soft avocado, well mashed, about 1/4 medium avocado
1 Cup water
1 Tbsps white vinegar
1 tsp vanilla extract

Ganache

200 ml sourcream
150 gm chocolate chips or chopped chocolate
2 tsp instant coffee powder
1 tsp hot water
4 Tbsp icing sugar, sifted
*For making ganache, among Indian chocolate brands, I suggest using Cadbury Bournville.


Steps:

Preheat oven to 180° C. Grease and dust an 8" round pan.

Sift together all of the dry ingredients except the sugar.  Set aside.

Mash the avocado. Mix it with remaining wet ingredients in a bowl.

Add sugar into the wet mix and stir.

Mix the wet ingredients with the dry ones all at once. Stir until smooth.

Pour batter into a the prepared pan. Bake for 35-40 minutes, until a toothpick inserted into the center comes out clean.
Cool the cake in cake pan for 10 minutes. Turn it out onto a wire rack. Let cool completely.

Preparing Ganache:
Dissolve the coffee in the hot water, set aside.

Heat the sourcream in a heavy bottom pan. Once small bubbles appear around the edges of the cream, remove from heat and add the chocolate chips.
Stir every 2 minutes, to ensure all the chocolate is melted. If you find unmelted chocolate chips, reheat cream-chocolate mixture on double boiler for about 10-15 seconds.

Once the chocolate is completely melted, add sifted icing sugar and mix. Ensure that no lumps remain.
Add the coffee once the ganache is warm to touch.

You can use the ganache right away by pouring it as a glaze on the cake. It thickens as it cools. Once thickened, you can spread it on the cake with a spatula. I kept the ganache in refrigerator for about 2 hours and whipped it to get a lighter fluffier texture. On whipping, it lightens in color too, this gave a good contrast to the dark rich chocolate cake.

Assembly:
Slice the cake horizontally in two layers. Spread about half the ganache on bottom layer, leaving about 1/4 inch around the border. The filling gets pushed towards the edges once you place the top layer.
Lightly lay the top cake layer on the ganache filling. Dump remaining ganache on the top layer and spread evenly. You can make swirls using the spatula.

Try baking this cake while the avocado season lasts. As Rose says 'You won't regret it'.

Happy Baking!
Shwe

Monday, June 3, 2013

Citrus Burst


I like citrus fruits in cakes. Have I mentioned that earlier? I made this Orange Sourcream cake to make use of the last of desi oranges of this season. This is a simple looking cake, till you take a bite....mmm and then you are lost in the flavour.

Orange Sourcream Cake

Talking of simple, there is this small, humble shop I visited few years back in Pune, Aadinath Stainless Steel Center. It is located in Narayan Peth, near Kanya Shala. It stores racks n racks of cake pans, cookie sheets, pudding moulds etc. And if you bug the shopkeeper a little he just might show you hidden treasures like cream-roll moulds, icing tips and bags, rose pins, scrapers; just the kind of shop a baker would be interested in. 

And about half a kilometer ahead is the 'Pune Bakery', famous for its patties or puffs. We chose to try these 'naans', they were yum.

Vegetable and Cheese naans from Pune Bakery

While in Pune, I also came across an innovative concept called 'Toy-brary'. It is a library of toys, games, CDs and children books where kids can go and borrow toys etc and return it in a week. Sounds fun doesn't it, to be able to play with new toys, read new books every week!

Orange Sourcream Cake

But, I digress. The cake recipe is adapted from here. This cake is tender and moist and the glaze adds to the moisture. Since I ran out of orange juice for the glaze, I went for a simple syrup and added some cardamom for flavour. You can skip the glaze and instead sprinkle powdered sugar on the top. I baked the cake in an 8" round pan, the cake was taller than shown in the original recipe.

fine, sharp grater is the best tool to get the zest of any citrus fruit. If neither is available, you can, with a very sharp knife, take out the outermost skin of the peel. Carefully avoid the white pith beneath, it is bitter. To get the best flavour out of the zest rub it in some sugar with your finger tips. If you get zest using a knife, pulse it with sugar in a mixer/food processor.

Orange Zest | Prepared pan with recipe

While I was preparing the ingredients, my mother suggested to use the entire pulp of orange instead of just the juice. So I removed the skin and seeds of the orange slices and ran them in a mixer. It increased the fiber content and made the cake more moist, more flavourful. Here's the recipe:


Orange Sour Cream Cake


Ingredients:

Cake
3/4 Cups + 2 Tbsps All purpose flour
1/2 Cups whole wheat flour
2 Tbsps cornflour or custard powder
1 tsp baking powder
1/4 tsp salt
3/4 cup sour cream
1/4 cup ghee, room temperature
3/4 cup sugar
1 tbsp orange zest
2 large eggs
1/2 tsp vanilla extract
1/2 cup orange juice + pulp

Glaze/Syrup
3 Tbsps sugar
3 Tbsps water
1 pod cardamom, powdered


Steps:

Preheat oven to 180° C. Grease and dust an 8" round pan.

In a medium bowl, whisk together flours, cornflour, baking powder and salt.

Pulse the sugar and zest in mixer/food processor. In a large bowl, beat together ghee, sugar-zest mixture for 2 minutes. Add in eggs one at a time, and beat mixture until smooth and well-combined.  Add vanilla extract and mix.

Mix in one third of the flour mixture, followed by the sour cream. Mix in another third of the flour mixture, followed by the orange juice. Stir in all remaining flour, mixing until no streaks of dry ingredients remain. Pour into prepared pan.

Bake for 35-40 minutes, until a toothpick inserted into the center comes out clean.Cool the cake in cake pan for 10 minutes. Turn it out onto a wire rack.

To prepare the syrup, mix sugar and water in a pan. Put the pan on medium heat and keep stirring till sugar is dissolved. Remove from heat and stir in the cardamom powder. Let the syrup cool.

While the cake is slightly warm, drizzle the syrup evenly over the cake. Allow syrup to soak in while the cake cools. Allow cake to cool completely before slicing.

Happy Baking!
Shwe

Monday, May 20, 2013

In chocolate heaven


That's where a bite into this cake will take you. Bitter-sweet, intense, scrumptious - all that a chocoholic wants. Plus added nuttiness of almonds. Need I say more?

Chocolate Almond Sourcream Cake slice

I baked this cake on a recent trip to Mumbai. My cousin there told me she wanted to learn to bake a cake. "Easy or complicated?" I asked, "Tasty" she replied. I chose to bake this chocolate cake by Donna Hay that she shared in her 50th Issue magazine. I have tried this recipe thrice before, each time with some twist, each time devoured by happy content faces.

Early morning visit to Juhu Beach

Since baking is not a very common hobby in India, it is difficult to find shops which sell the tools and raw materials. Bakers, especially home-bakers, are always on a hunt for these. Arrife at Bandra West is one such store. It is a familiar name among the baking community and it was on my agenda while I was in Mumbai. A tiny shop selling pans, moulds, liners, fondant-plungers, exotic ingredients for far-away lands… and I almost started dreaming there!


I baked this cake in a microwave oven in convection mode and the cake turned out just fine. This blog post by Suma Rowjee of Cakes and More was very helpful. 
In the post she has given loads of gyaan and useful tips for microwave convection-mode baking.

I haven't tried baking in microwave mode. You can try, only that the cake will be cooked instead of being baked and you'll not get the trademark crust that a regular oven gives.


The cake has an intense chocolate flavour. I suggest using the best cocoa powder you can find. I used Nilgiri's cocoa powder. I find it better than Cadbury's cocoa powder. Nilgiri's is a bakery-grocery-dairy superstore chain located in southern India. 
The original recipe includes glaze which I omitted, the intended audience wasn't ready to wait. I increased the sugar in the cake batter by 2 tablespoons instead. Since butter wasn't available I used ghee and increased the sour cream. The original recipe uses 2/3 cup butter and 3/4 cup sour cream. The granularity of the almonds can also be changed from fine meal to coarsely chopped, the cake would still be yum. Also sour cream can be replaced with yogurt, not very sour one. My cake top developed some thin cracks all around, maybe a sign of overshooting bake time by 2-3 minutes, but the taste was awesome.  Here’s the recipe:

Chocolate Almond Sourcream cake


Ingredients:

1/3 Cup ghee, thick n grainy
2/3 Cup + 2 Tbsps demerara/brown sugar
1 Cup sour cream
2 eggs
1 tsp vanilla extract
1/2 Cup almond meal
1 Cup All-purpose flour
1/2 tsp baking powder
1/4 tsp baking soda
1/2 cup cocoa powder

Steps:

Preheat oven to 180° C. Grease and dust an 8” round pan.

Sift flour, baking powder, baking soda and cocoa powder. Add almond meal and mix using a wire whisk. Set aside.

Beat the ghee and damerera sugar for 2 minutes.

In a different medium-sized bowl, whisk together the eggs, sour cream and vanilla.

Add egg mixture to the ghee mixture. Mix slightly. Add dry ingredients and mix till combined (do not over mix). Spoon the batter into the prepared cake pan. 

Bake for 35 minutes or until a cake tester inserted into the cake comes out clean.

Cool in cake pan for 10 minutes.  Turn out onto a wire rack to cool completely.

Cut a big slice, take a bite, close your eyes n savour the intense chocolate flavour. The cake just melts in your mouth. And before you know it disappears in a poof!

Happy Baking!
Shwe

Friday, May 3, 2013

When life gives you lemons...

But if you happen to have blueberries too, I suggest you take out your whisk n bowls and bake a lemon blueberry buttermilk cake. For those who haven't tasted lemon in bakes it is a tangy, sweet and refreshing experience. Berries and citrus fruits are a very classic combination; a must try.


Lemon Blueberry Buttermilk Cake

I love fruits and I prefer fresh fruits over tinned. But tinned is the only way blueberries are available in India. I had saved a small batch of these from one of my previous bakes. This time I wanted a more pronounced lemon flavour.

The recipe is adapted from here and it sure is a moist cake as the author mentions in her post. I made some changes based on the ingredients I had on hand and the comments to the original recipe. I reduced the fat and the sugar. I added some scraped vanilla beans. I loved the tiny specks of vanilla scattered in the slice. I would have been happier if I had more berries to add.

Every cake requires some form of fat, usually butter. But here, we use oil which makes the cake moist. From my past experience, oil based cakes tastes like... well oil, which is not a very pleasant experience. But this cake changed my opinion.

About to bake; vanilla beans; lemons

I baked this cake in two mini loaf pans and about 10 cupcake moulds. I soaked in lemon juice one loaf and a couple of cupcakes while left the other loaf as-is. The soaked loaf was devoured as light pre-lunch dessert while my sister-in-law prepared this yummy brinjal/eggplant curry for lunch. The non-soaked loaf was a tea/snack time bite. Though you can reduce the sugar in the cake, I suggest not to skimp on the lemon syrup. The syrup gives the cake its tang.


Lemon Blueberry Buttermilk Cake

This cake batter is prepared using the muffin method. In that you measure your dry and wet ingredients in two separate bowls and combine the two by stirring them together very briefly. Here's the recipe:


Lemon Blueberry Buttermilk Cake


Ingredients:

1 1/2 Cups All-purpose flour
2 tsps baking powder
2 pinches of salt
1 Cup buttermilk
3/4 Cup sugar
3 large eggs
1 tsps grated lemon zest
1 vanilla bean, scrapped or 1/2 tsp pure vanilla extract
1/3 Cup vegetable oil
1/3 Cup blueberries, washed and dried

Lemon Syrup
2 Tbsps freshly squeezed lemon juice
2 Tbsps powdered sugar


Steps:

Preheat the oven to 180°C. Grease-line-dust the mini-loaf pans.

Sift together flour, baking powder, and salt into a bowl. In another bowl, whisk together the buttermilk, sugar, the eggs, lemon zest, vanilla and oil. Slowly whisk the dry ingredients into the wet ingredients. 

Pour the batter into the prepared pans. Mix the blueberries with a tablespoon of flour and sprinkle them on top of the batter. Bake for about 25 minutes, or until a cake tester placed in the center of the loaf comes out clean.

Meanwhile, cook the lemon juice and powdered sugar in a small pan until the sugar dissolves and the mixture is clear. Set aside.

When the cake is done, allow it to cool in the pan for 10 minutes before flipping out onto a cooling rack. Place the cooling rack above a plate to contain the dripping syrup. While the cake is still warm make tiny holes in the loaf and pour the lemon-sugar syrup over the cake and allow it to soak in. Let cool.

Happy Baking!
Shwe